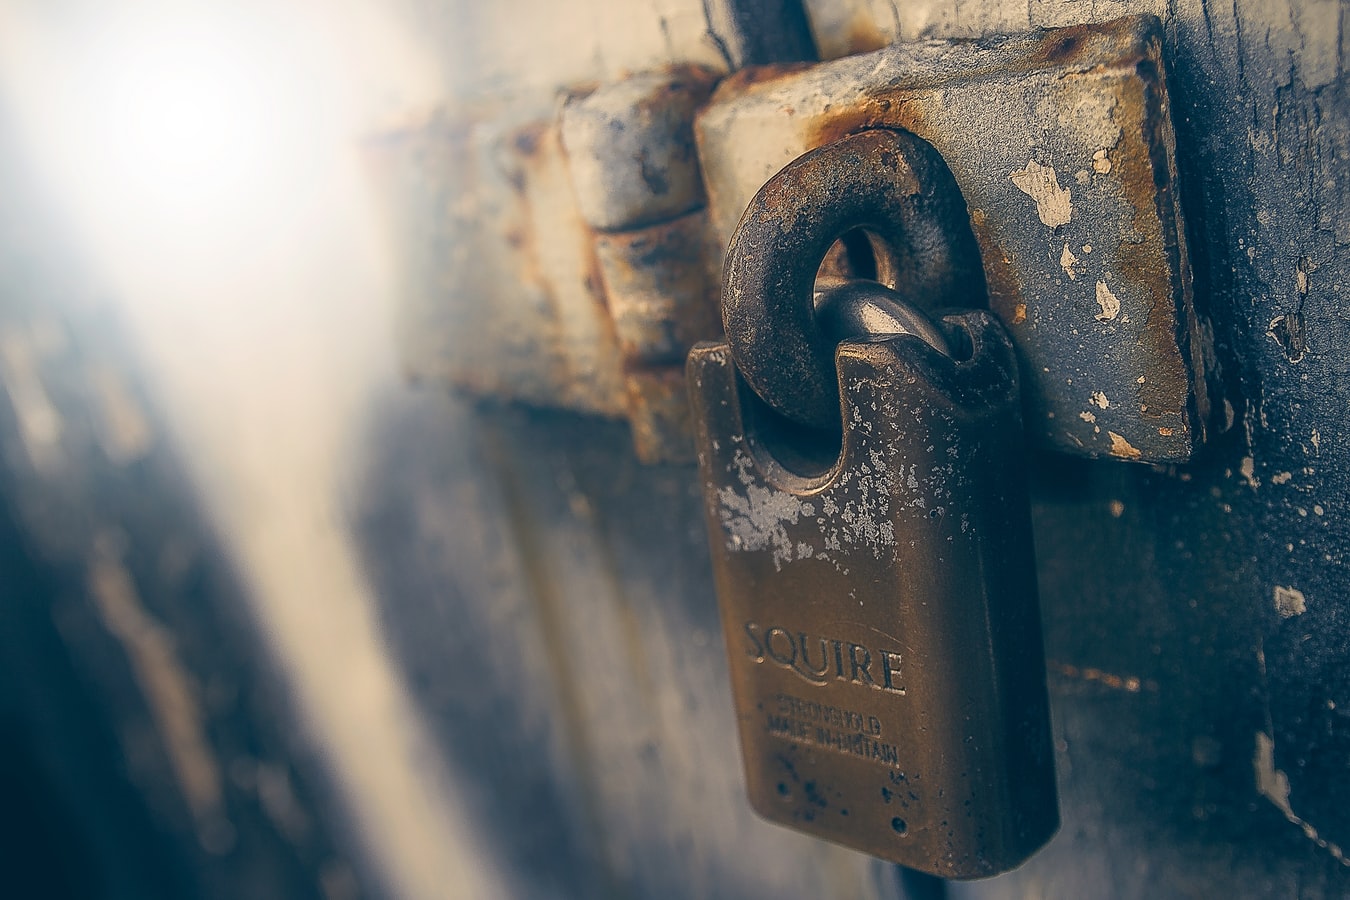
Lock Picking Detection With Machine Learning - Audio Classification

Mathias Pfeil
Author

Machine Learning
Category
July 24 2019
Time Created
In this article, we will look at a simple audio classification model that detects whether a key or pick has been inserted into a lock. We will take in live audio from a microphone placed next to our lock, cut the audio at every 5 second mark and pass those last 5 seconds to our pre-trained model. We then print out any events we may detect, including “static”, “pick”, or “key”. We will also log the date and time of the the event, and save the audio clip of the incident.
If you would like to try this yourself, here are some of the supplies: Microphone, Lock picks, and a practice lock (if you are new to picking).
If you would like a quick explanation in video format, I will leave that here. Otherwise, you can keep reading below.
First, we need data. As I’m sure you can guess, there isn’t really a dataset for something this specific, so we need to create one first. This could be accomplished by recording hundreds of five second clips, but instead we will record multiple 10 minute clips, then break them into 5 second segments. I recorded the longer videos with Audacity, then broke them into 5 second segments using a simple script. In total, I got about 1000 audio clips for training using this method.
from pydub import AudioSegment
import math

t2 = 5000

newAudio = AudioSegment.from_wav("./audio/clips/pick/pick_insert.wav")
audio_len = math.floor( math.floor( len(newAudio) / 1000 ) / 5 ) - 1

for i in range(audio_len):
    newAudio = AudioSegment.from_wav("./audio/clips/pick/pick_insert.wav")
    t1 = t2
    t2 = t2 + 5000
    newAudio = newAudio[t1:t2]
    newAudio.export('./audio/done/test/clip' + str(i) + '.wav', format="wav")
Now that we have our data, let’s make testing our model a little easier by turning our features and labels into pickle files.
import numpy as np
import os
from tqdm import tqdm
import random
import pickle
from scipy.io.wavfile import read
from pydub import AudioSegment

DATADIR = "./audio/done"

CATEGORIES = ["key", "pick"]

training_data = []

def create_training_data():
    for category in CATEGORIES:

        path = os.path.join(DATADIR,category)
        class_num = CATEGORIES.index(category)

        for audio in tqdm(os.listdir(path)):
            input_data = read(os.path.join(path,audio))
            audio = input_data[1]
            training_data.append([audio,class_num])


create_training_data()

random.shuffle(training_data)

X = []
y = []

for features,label in training_data:
    X.append(features)
    y.append(label)

X = np.array(X).reshape(-1, 1, 220500, 2)

pickle_out = open("X.pickle","wb")
pickle.dump(X, pickle_out)
pickle_out.close()

pickle_out = open("y.pickle","wb")
pickle.dump(y, pickle_out)
pickle_out.close()
All that’s left to do now is train our model. I achieved a little more than 90% accuracy on both training and validation sets using the code posted below. I should also note that this code is almost exactly the same as a typical image classifier, which I found pretty interesting! Only needed a couple tweaks.

import tensorflow as tf
import pickle
from tensorflow.keras.callbacks import TensorBoard
import os

pickle_in = open("X.pickle","rb")
X = pickle.load(pickle_in)

pickle_in = open("y.pickle","rb")
y = pickle.load(pickle_in)

tensorboard = TensorBoard(log_dir=os.path.join('logs', 'one-off-test'))

model = tf.keras.models.Sequential()

model.add(tf.keras.layers.Conv2D(32, kernel_size=3, strides=3, padding="same", input_shape=X.shape[1:], activation='relu'))
model.add(tf.keras.layers.Conv2D(64, kernel_size=3, strides=3, padding="same", activation='relu'))
model.add(tf.keras.layers.Conv2D(128, kernel_size=3, strides=3, padding="same", activation='relu'))
model.add(tf.keras.layers.BatchNormalization(momentum=0.99))
model.add(tf.keras.layers.Conv2D(64, kernel_size=3, strides=3, padding="same", activation='relu'))
model.add(tf.keras.layers.Conv2D(32, kernel_size=3, strides=3, padding="same", activation='relu'))

model.add(tf.keras.layers.Flatten())

model.add(tf.keras.layers.Dense(1, activation=tf.nn.sigmoid))
model.summary()
model.compile(loss='binary_crossentropy',
              optimizer=tf.keras.optimizers.Adam(lr=.0001),
              metrics=['accuracy'])

model.fit(X, y, batch_size=32, epochs=15, validation_split=0.4, callbacks=[tensorboard])

model.save('key_or_pick.h5')
Once our model is done training, we should get a key_or_pick.h5 file. Now we just need to pull in live audio and classify it using our pre-trained model. I will leave the code and an explanation below, which I recommend you read. The code is not very efficient, which I get into in my explanation.
import pyaudio
import wave
import os
import tensorflow as tf
from scipy.io.wavfile import read
from scipy.io.wavfile import write
import time
import datetime
import numpy as np
from pydub import AudioSegment


CATEGORIES = ["key", "pick"]
os.environ['TF_CPP_MIN_LOG_LEVEL'] = '3'
model = tf.keras.models.load_model('./../key_or_pick.h5')


CHUNK = 4410
FORMAT = pyaudio.get_format_from_width(2, unsigned=False)
CHANNELS = 1
RATE = 88200
RECORD_SECONDS = 6
WAVE_OUTPUT_FILENAME = "output.wav"


def is_static(arr):
    return max(arr.flatten()) < 5000


def log_event(event, event_audio, wr):
    now = datetime.datetime.now()
    save_time = now.strftime('%Y-%m-%d-%H-%M-%S')
    f = open("log.txt", "a")
    f.write(event + ' detected - ' + save_time + "\n")
    f.close()

    write('./events/' + (event + ' - ' + save_time) + '.wav', wr, event_audio)


while True:
    p = pyaudio.PyAudio()

    stream = p.open(format=FORMAT,
                    channels=CHANNELS,
                    rate=RATE,
                    input=True,
                    frames_per_buffer=CHUNK)

    print("..")
    frames = []

    for i in range(0, 100):
        data = stream.read(CHUNK)
        frames.append(data)
    print(".")

    stream.stop_stream()
    stream.close()
    p.terminate()

    wf = wave.open(WAVE_OUTPUT_FILENAME, 'wb')
    wf.setnchannels(CHANNELS)
    wf.setsampwidth(p.get_sample_size(FORMAT))
    wf.setframerate(RATE)
    wf.writeframes(b''.join(frames))
    wf.close()
    wav_rate, input_data = read('./output.wav')
    audio = input_data

    X = np.array(audio).reshape(-1, 1, 220500, 2)

    if(is_static(X[0])):
        print('Static')
    else:
        prediction = model.predict(X)[0][0].item()
        print("{0:.2f}".format(prediction) + ' - ' + CATEGORIES[round(prediction)].replace('_',' '))
        event_type = CATEGORIES[round(prediction)].replace('_',' ')
        log_event(event_type, input_data, wav_rate)
First, we will create an audio stream so we can listen for events. Every five seconds we will cut and save the clip. The five second clip we just saved will then be loaded in again and passed to our pre-trained model to classify the audio. We will then print the prediction to the screen. Once we get our prediction, we will also log it to a log file, then save the audio clip that triggered the event.
You might have noticed how inefficient saving the auto clip and then loading it back in is. I did it this way just to keep development time low. I’m certain there is a way to get the data from the stream processed into a form the model will accept, but in my limited testing, it was more of a hassle than I wanted for a fun one day project that won’t see production.
Anyway, we can now run our script to listen for keys or picks!

I hope this article was helpful for anyone getting into audio classification! Creating your own datasets and training a model on that data is a gratifying experience, so I definitely see myself doing more projects like these in the future.